
Welcome to your new favorite weeknight hero: Instant Pot Chili Mac! This hearty, flavorful, and incredibly easy one-pot meal is designed to satisfy even the hungriest of crowds. Imagine tender ground beef, perfectly cooked pasta, savory beans, and a rich, spiced tomato sauce, all enveloped in gooey, melted cheese. It’s the ultimate comfort food, made effortlessly in your Instant Pot, ensuring minimal cleanup and maximum deliciousness.

Are you frequently searching for a hassle-free, homemade meal that can conquer the midweek slump? Look no further. Our Instant Pot Chili Mac is an instant crowd-pleaser that delivers on flavor without demanding hours in the kitchen. Combining robust ground beef, zesty diced tomatoes, creamy kidney beans, and a carefully curated blend of warm chili spices, all tossed with delightful curly cavatappi pasta and a generous amount of gooey cheese, this dish is a true culinary marvel.
The beauty of this recipe lies in its simplicity. Everything comes together in a single pot, thanks to the magic of the Instant Pot. This means not only a quick cooking process but also a remarkably easy cleanup, allowing you more time to savor your meal and relax after a long day. Trust us, with this Instant Pot Chili Mac, you can enjoy a delicious, filling, and genuinely homemade dinner with minimal effort, making it a staple in your busy life.
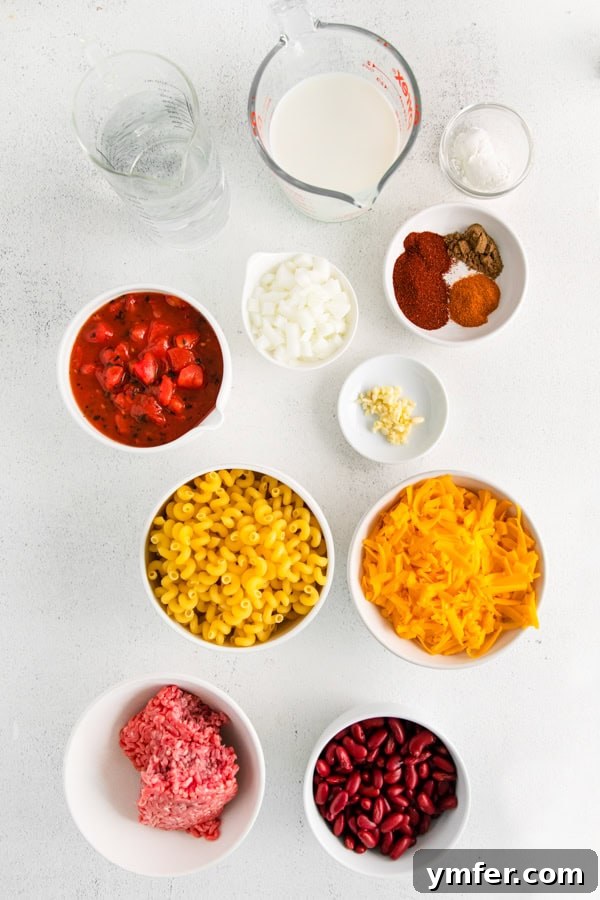
Essential Ingredients for the Best Instant Pot Chili Mac
Creating an extraordinary Instant Pot Chili Mac starts with quality ingredients. Each component plays a vital role in building the layers of flavor and texture that make this dish so irresistible:
- Ground Beef: The foundation of this hearty chili mac. We recommend using 80/20 ground beef for the perfect balance of flavor and tenderness. The fat renders down to create a rich base, enhancing the overall taste. For a lighter version, ground turkey or chicken can be excellent substitutes, offering a milder flavor profile.
- Onion and Garlic: These aromatic powerhouses are non-negotiable. Diced onion and minced garlic provide an earthy, savory depth that forms the backbone of the chili flavor. Sautéing them until fragrant is key to unlocking their full potential.
- Chili Spices (Chili Powder, Smoked Paprika, Cumin): This trio delivers the signature warm, savory, and slightly smoky flavors characteristic of classic chili. Chili powder provides a foundational warmth, smoked paprika adds a beautiful depth and color, and cumin offers an earthy, pungent kick. Feel free to adjust quantities to suit your spice preference.
- Kidney Beans: These firm, slightly nutty, and creamy beans add fantastic texture and substance to the chili mac. They absorb the rich flavors of the sauce, making each bite more satisfying. If kidney beans aren’t your favorite, black beans or pinto beans make great alternatives, or you can omit them entirely if you’re a bean purist.
- Whole Milk: Incorporating whole milk is crucial for achieving that desired creamy consistency in the sauce, balancing the robust chili flavors with a touch of richness. For an even richer dish, you could opt for half-and-half.
- Shredded Cheese: The quintessential gooey element! A blend of shredded cheddar cheese is classic for chili mac, providing sharp, savory notes and that irresistible melty texture. Feel free to use your favorite store-bought blend or, for the best melt and flavor, shred your own cheddar, Monterey Jack, or Colby cheese.
- Beef Stock: This is the primary liquid for cooking the pasta and infusing the entire dish with a deep, savory, meaty flavor. Low-sodium beef stock allows you to control the seasoning precisely.
- Cornstarch: A simple yet effective thickening agent. When mixed with a bit of water or milk to create a slurry, cornstarch helps to create a luscious, velvety sauce that coats every strand of pasta and every piece of beef beautifully.
- Diced Tomatoes (Fire Roasted): Slightly sweet and savory, diced tomatoes add a crucial burst of freshness, acidity, and moisture to the chili base. Fire-roasted varieties introduce an extra layer of smoky flavor, elevating the overall taste.
- Cavatappi Pasta: This S-shaped tube pasta, resembling a corkscrew, is ideal for chili mac because its unique shape holds onto the rich sauce wonderfully. If cavatappi is unavailable, classic elbow macaroni, shell pasta, or even rotini work perfectly well. Ensure you use dried pasta for pressure cooking.

Customizing Your Chili Mac: Protein Alternatives
While ground beef is a traditional and delicious choice for chili mac, offering a rich, robust flavor, this recipe is incredibly versatile. Don’t hesitate to experiment with other proteins to suit your dietary preferences or what you have on hand:
- Ground Chicken: For a leaner option with a milder flavor, ground chicken is an excellent substitute. It absorbs the chili spices beautifully, resulting in a lighter yet equally satisfying meal.
- Ground Turkey: Similar to ground chicken, ground turkey provides a healthier alternative. Opt for a higher fat content (like 93/7) to prevent the dish from becoming too dry.
- Vegetarian Options: For a plant-based twist, consider using plant-based ground crumbles or a hearty combination of lentils and finely diced mushrooms. You’ll still achieve a rich texture and absorb all those wonderful chili flavors.
To Bean or Not to Bean? Your Chili Mac, Your Choice!
The inclusion of beans in chili can sometimes spark a lively debate among enthusiasts. If kidney beans aren’t your preference, or if you simply want to try something different, rest assured – this recipe is flexible! You have several options:
- Substitute with Black Beans: Black beans offer a slightly different texture and a mild, earthy flavor that pairs wonderfully with chili spices.
- Substitute with Pinto Beans: Pinto beans are another popular choice, known for their creamy texture and ability to absorb flavors well.
- Omit Them Entirely: If you’re not a fan of beans in your chili mac, feel free to leave them out. The dish will still be incredibly flavorful and satisfying thanks to the robust beef and cheesy sauce. Just remember that beans contribute to the bulk and nutritional value, so you might consider increasing the amount of pasta or beef slightly if omitting them.
Effortless Meal Prep: Instant Pot Chili Mac as an Easy Freezer Meal!
One of the many fantastic qualities of this Instant Pot Chili Mac recipe is its incredible suitability for meal prepping and freezing. You can easily prepare a generous batch, allowing you to enjoy homemade comfort food even on the busiest days without any additional cooking. Here’s how to turn it into a convenient freezer meal:
- Cook and Cool: Prepare the Instant Pot Chili Mac as directed. Once cooked, let it cool completely to room temperature. This step is crucial to prevent condensation and ice crystals from forming, which can affect the texture upon reheating.
- Portion and Pack: Carefully spoon the cooled chili mac into freezer-safe zip-top bags, leaving some headspace for expansion, or into airtight freezer-safe containers. Press out any excess air from the bags before sealing.
- Freeze: Label each bag or container with the date and freeze for up to 3 months.
- Reheat: When you’re ready to enjoy, simply thaw the chili mac in the refrigerator overnight. Reheat gently on the stovetop over medium-low heat, stirring occasionally, or in the microwave until heated through. You might want to add a splash of beef stock or milk during reheating to restore its creamy consistency.
Having pre-made portions of delicious Instant Pot Chili Mac in your freezer is a game-changer for quick lunches or last-minute dinners, ensuring you always have a comforting meal within reach.
Understanding the Instant Pot: Your Culinary Game-Changer
For those new to the world of electric pressure cookers, the term “Instant Pot” might seem a bit mysterious. An Instant Pot is essentially a multi-cooker that has revolutionized modern kitchens. It’s much more than just a pressure cooker; it can sauté, slow cook, steam, make rice, yogurt, and, of course, pressure cook with incredible efficiency.
Many people recall daunting stories about old-fashioned stovetop pressure cookers, which could be intimidating and sometimes even unsafe. However, modern electric pressure cookers like the Instant Pot are remarkably different. They are designed with multiple safety mechanisms, making them significantly safer and incredibly user-friendly. These devices use high-pressurized steam to cook food at a much quicker rate compared to traditional stovetop methods or slow cookers. This means you can achieve tender meats, perfectly cooked grains, and flavorful stews in a fraction of the time.
If you’re new to the electric pressure cooker world, don’t worry! Instant Pots are surprisingly easy to master. The intuitive controls and built-in safety features make the cooking process straightforward and enjoyable. You will absolutely love how it transforms your cooking routine, enabling you to create complex, flavorful dishes with minimal hands-on time.

Instant Pot vs. Electric Pressure Cooker: A Simple Clarification
The terms “Instant Pot” and “electric pressure cooker” are often used interchangeably, leading to some confusion. To clarify, Instant Pot is a specific brand name for a popular line of electric multi-cookers. Think of it like calling all adhesive bandages “Band-Aids” or all tissues “Kleenex.” Over time, a dominant brand name can become synonymous with the general product type.
Therefore, while all Instant Pots are electric pressure cookers, not all electric pressure cookers are Instant Pots. Many other reputable brands, such as Crock-Pot, Ninja Foodi, and Cuisinart, also produce excellent electric pressure cookers that function similarly and yield equally delicious results. The key takeaway is that any electric pressure cooker will work for recipes like this Instant Pot Chili Mac, as the cooking principles are the same across brands.
Understanding Pressure Release: Natural Release vs. Quick Release
When cooking with an Instant Pot or any electric pressure cooker, you’ll frequently encounter instructions to “natural release” or “quick release” the pressure. Understanding the difference is crucial for successful pressure cooking and safety.
- Natural Pressure Release (NPR): When a recipe calls for a “natural release,” it means you allow your Instant Pot to depressurize on its own. After the cooking cycle finishes, the pot will gradually and slowly release the pressure over time. This process typically takes anywhere from 10 to 20 minutes or even longer, depending on the volume and type of food inside. Natural release is often used for foods that benefit from a slower depressurization, such as large cuts of meat, stews, or delicate foods like rice, as it helps prevent them from becoming tough or breaking apart. It also allows the food to continue cooking gently as the pressure drops, resulting in more tender and flavorful results. You don’t need to do anything; the float valve will eventually drop, indicating all pressure has been released and the lid can be safely opened.
- Quick Pressure Release (QPR): A “quick release” means you manually vent the pressure from the Instant Pot immediately after the cooking cycle is complete. To do this, you carefully turn the steam release handle (or press the release button, depending on your model) from the “sealing” to the “venting” position. Be extremely cautious during this step, as a forceful burst of hot steam will rapidly escape from the vent. It is vital to keep your hands and face clear of the steam to prevent burns. Quick release is typically used for foods that cook quickly and might overcook if left under pressure, such as vegetables, seafood, or pasta (as in this chili mac recipe). It stops the cooking process promptly, ensuring your food doesn’t become mushy. Once the float valve drops, you can safely open the lid.
Always refer to your specific Instant Pot model’s manual for proper operation and safety guidelines, especially when performing a quick release.

Storage and Reheating Leftovers
One of the best things about Instant Pot Chili Mac is that it tastes even better the next day! This makes it an excellent option for meal prepping or simply enjoying delicious leftovers.
- Storage: Allow any leftover chili mac to cool completely before transferring it to an airtight container. Store it in the refrigerator for up to 3 days. Properly sealed containers will keep it fresh and prevent it from drying out.
- Reheating:
- Microwave: For individual portions, place the chili mac in a microwave-safe dish. Loosely cover it with a damp paper towel to help retain moisture and prevent splattering. Heat on medium power for 2-3 minutes, stirring halfway through, until heated thoroughly. Add a splash of milk or beef stock if it appears too thick.
- Stovetop: For larger quantities, transfer the chili mac to a saucepan or pot. Add a small amount of beef stock or milk (about 1/4 to 1/2 cup per serving) to help rehydrate and loosen the sauce. Heat over medium-low heat, stirring frequently, until warmed through. Be careful not to overheat, which can cause the cheese to separate.
Discover More Instant Pot Delights
If you’ve fallen in love with the convenience and deliciousness of Instant Pot cooking, there’s a whole world of recipes waiting for you to explore. From comforting main courses to delightful sides, your Instant Pot can handle it all:
- Easy Side Dish: Enhance any meal with my Instant Pot Mashed Sweet Potatoes – perfectly creamy and flavorful every time.
- Another Hearty Chili: Craving more chili goodness? Try my Instant Pot Ground Chicken Chili for a lighter yet equally satisfying option.
- Comforting Soup: For a cozy and healthy meal, whip up my Instant Pot Zucchini Soup – it’s surprisingly rich and flavorful.
- Elegant Red Meat Dish: Impress your guests (or yourself!) with my Instant Pot Red Wine Rosemary Short Ribs, fall-off-the-bone tender in a fraction of the traditional time.
Instant Pot Chili Mac
By: Brandy O’Neill – Nutmeg Nanny
Servings: 4 servings
Prep time: 10 mins
Cook time: 25 mins
Total time: 35 mins
This Instant Pot chili mac will feed the hungriest of crowds any night of the week! Full of ground beef, spices, beans, and gooey cheese, you’ll love how easily it comes together!
Ingredients
- 1/2 pound 80/20 ground beef
- 1/2 cup diced onion
- 2 cloves garlic, minced
- 1-1/2 tablespoons chili powder
- 1 teaspoon smoked paprika
- 3/4 teaspoon ground cumin
- 3 cups beef stock
- 1-1/2 cups whole milk
- 8 ounces dried cavatappi pasta
- 1 15 ounce can fire roasted diced tomatoes
- 1 can kidney beans, drained and rinsed
- 2 cups shredded cheddar cheese
- 1 tablespoon cornstarch
Instructions
- Heat your Instant Pot using the Sauté function (Normal setting).
- Add the ground beef to the hot Instant Pot. Cook, breaking it up into small pieces with a wooden spoon, for about 3-5 minutes until it just begins to brown. Drain any excess fat if desired.
- Next, add the diced onion to the pot with the beef. Continue to cook for another 2-3 minutes, stirring occasionally, until the onion softens and the beef is fully browned and slightly crisp.
- Stir in the minced garlic, chili powder, cumin, and smoked paprika. Cook for an additional minute, allowing the spices to become fragrant.
- Pour in the beef stock. Use a wooden spoon or spatula to scrape up any browned bits from the bottom of the Instant Pot liner. This step, called deglazing, is crucial for preventing a “Burn” notice and ensures all the flavorful fond is incorporated into the sauce.
- Add the whole milk, dried cavatappi pasta, fire-roasted diced tomatoes, and drained and rinsed kidney beans to the pot. Stir gently to combine all ingredients and ensure that the pasta is fully submerged in the liquid.
- Season generously with salt and pepper. We recommend starting with about 1 teaspoon of salt and 1/2 teaspoon of black pepper, and you can adjust to taste later.
- Secure the lid on the Instant Pot and ensure the sealing valve is in the “Sealing” position. Select the “Pressure Cook” or “Manual” setting and set the cooking time for 5 minutes on High pressure.
- Once the Instant Pot finishes the cooking cycle, perform a Quick Release (QR) by carefully switching the valve to the “Venting” position. Be extremely cautious as hot steam will rapidly escape. Keep your hands and face clear to avoid splatters or burns. The float valve will drop when the pressure is fully released.
- While the pressure is releasing, in a small bowl, stir together the shredded cheddar cheese and cornstarch until the cheese is lightly coated. This helps prevent the cheese from clumping when added to the hot liquid.
- Turn the Instant Pot back to the Sauté function (Low setting). Add the cheese and cornstarch mixture to the chili mac, about 1/2 cup at a time, stirring constantly. Continue adding the cheese in batches, stirring until each addition is fully melted and incorporated. Continue stirring until the Chili Mac thickens to a rich, creamy consistency.
- Taste the chili mac and season with additional salt and pepper if needed.
- Serve this comforting Chili Mac immediately, garnished with your favorite toppings such as sliced green onion, sliced jalapeño, fresh chopped cilantro, a dollop of sour cream, or extra shredded cheese.
- Store any remaining leftovers in an airtight container in the refrigerator for up to three days.
Nutrition
- Serving:
- 1g
- Calories:
- 630kcal
- Carbohydrates:
- 53g
- Protein:
- 39g
- Fat:
- 30g
- Saturated Fat:
- 15g
- Polyunsaturated Fat:
- 11g
- Trans Fat:
- 1g
- Cholesterol:
- 93mg
- Sodium:
- 1166mg
- Fiber:
- 9g
- Sugar:
- 11g
Nutrition information is automatically calculated, so should only be used as an approximation.
Additional Info
Course: Instant Pot
Cuisine: American