
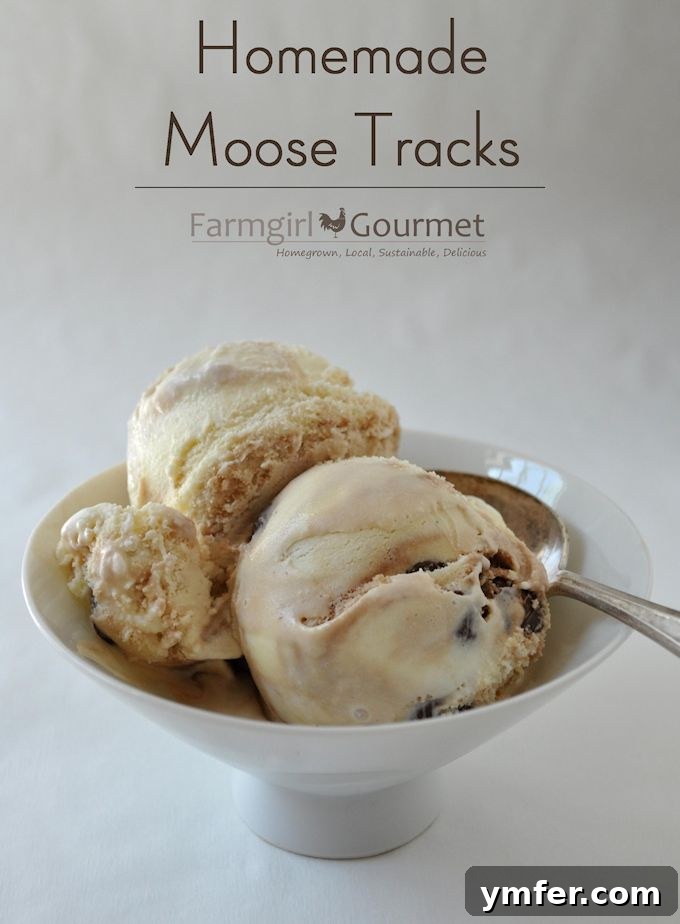
Indulge your sweet tooth with this incredible homemade Moose Tracks ice cream recipe, a dream come true for every chocolate and peanut butter enthusiast. Imagine creamy vanilla ice cream, generously swirled with rich, warm hot fudge sauce, and studded with an abundance of chopped peanut butter cups. This isn’t just ice cream; it’s a celebration of classic flavors, perfectly balanced for an unforgettable dessert experience. Forget store-bought pints; making this iconic treat at home allows for unparalleled freshness, customization, and a truly superior taste that will have everyone asking for seconds. Get ready to churn up a batch of pure bliss!
This delightful recipe comes to us courtesy of my wonderful west coast friend, Heather from Farmgirl Gourmet. Heather and I connected through Twitter and have been sharing culinary inspirations ever since! Knowing my weakness for the combination of fudge and peanut butter, I’m convinced she crafted this recipe with me specifically in mind. And oh, am I glad she did!
What Exactly is Moose Tracks Ice Cream?
Moose Tracks ice cream is a beloved flavor that features a sweet vanilla ice cream base, distinctive ribbons of rich fudge, and delectable mini peanut butter cups generously mixed throughout. It’s a flavor combination that has captivated dessert lovers for decades, offering a perfect blend of sweet, salty, creamy, and crunchy in every spoonful. The “moose tracks” name is thought to evoke the idea of footprints left in fresh snow, represented by the dark fudge ripples and the chunky peanut butter cup pieces.
While often associated with commercial brands, the magic of Moose Tracks is surprisingly easy to replicate in your own kitchen with an ice cream maker. Crafting your own ice cream at home not only ensures you know exactly what ingredients go into your dessert, but it also opens up a world of creativity. This robust vanilla bean base is incredibly versatile, serving as a perfect canvas for any mix-ins you desire, though we’ll stick to the classic fudge and peanut butter cups for this decadent version.
Why Opt for Homemade Ice Cream?
There’s a special joy and undeniable quality that comes with homemade ice cream that simply can’t be matched by store-bought varieties. Here’s why making your own Moose Tracks is a game-changer:
- Unmatched Freshness: Enjoy your ice cream at its peak freshness, with vibrant flavors and a creamy texture that hasn’t been compromised by preservatives or extended freezer storage.
- Control Over Ingredients: You dictate what goes in. Choose high-quality dairy, real vanilla, and your favorite brand of peanut butter cups. You can also adjust sugar levels to your preference.
- Customization is King: While we’re focusing on the classic Moose Tracks, a homemade base allows you to experiment with different fudge sauces, varying amounts of peanut butter cups, or even adding other complementary treats.
- Healthier Options: By making it yourself, you can avoid artificial flavors, colors, and high-fructose corn syrup often found in commercial ice creams.
- Cost-Effective: In the long run, making large batches of homemade ice cream can be more economical than continuously buying premium pints from the grocery store.
- Therapeutic Process: There’s a wonderful satisfaction in creating something delicious from scratch, especially a treat that brings so much joy.
Key Ingredients for Homemade Moose Tracks Ice Cream
Achieving that perfectly rich and creamy Moose Tracks ice cream at home starts with selecting the right ingredients. Each component plays a vital role in creating the signature flavor and texture:
- Half & Half: This provides a foundational richness for our custard base, a crucial step in achieving a smooth, luxurious texture without being overly heavy.
- Granulated Sugar: Essential for sweetness, the sugar also helps in lowering the freezing point of the ice cream, resulting in a softer, less icy final product.
- Large Eggs: The eggs are key to creating a luscious, French-style custard base. They contribute to the ice cream’s incredible creaminess and mouthfeel, preventing it from becoming too icy.
- Heavy Cream: This is where the true indulgence comes in. Heavy cream adds substantial fat content, which is vital for a rich, smooth, and scoopable ice cream texture.
- Vanilla Bean or Vanilla Bean Paste: For an authentic, robust vanilla flavor that forms the perfect backdrop for chocolate and peanut butter. A whole vanilla bean, split and scraped, infuses the cream with speckles of intense vanilla. Vanilla bean paste offers a fantastic and convenient alternative with similar visual appeal and flavor depth.
- Fudge Sauce: The signature “tracks” of Moose Tracks! You can elevate your ice cream by using a rich homemade hot fudge sauce, or opt for your favorite high-quality store-bought version for convenience. The quality of your fudge will significantly impact the final taste.
- Mini Peanut Butter Cups: These are the iconic chunks that make Moose Tracks so irresistible. Mini peanut butter cups are ideal as they distribute well throughout the ice cream. However, feel free to chop up larger peanut butter cups if that’s what you have on hand, or even explore other candy mix-ins like chocolate chips, pretzels, or cookie pieces for a unique twist!
Essential Equipment for Your Ice Cream Adventure
To successfully make this decadent ice cream, having the right tools on hand will make the process smooth and enjoyable:
- Ice Cream Maker: This is the most crucial piece of equipment. Whether you have a compressor model, a freezer bowl model, or a rock salt and ice bucket style, ensure it’s ready to go and its bowl is thoroughly chilled (for freezer bowl types).
- Medium Saucepan: For heating the half & half, sugar, and later, the custard base. A heavy-bottomed pan is best for even heating.
- Whisk: Essential for tempering the eggs and ensuring a smooth, lump-free custard.
- Heat-Resistant Spatula or Wooden Spoon: For stirring the cream mixture and checking its consistency.
- Fine-Mesh Sieve (Optional but Recommended): To strain the custard base after cooking, ensuring an extra smooth texture and removing any bits of cooked egg or vanilla bean pod.
- Medium-Sized Bowl: For chilling the custard mixture.
- Plastic Wrap: To cover the custard during chilling, ensuring it doesn’t form a “skin.”
- Airtight Freezer-Safe Container: A glass loaf pan or a dedicated ice cream container is perfect for hardening and storing your finished ice cream.
Crafting Your Homemade Moose Tracks Ice Cream: A Step-by-Step Guide
Making your own Moose Tracks ice cream is a rewarding process. Follow these detailed steps to achieve a perfectly creamy, chunky, and utterly delicious dessert:
Step 1: Prepare the Custard Base
- In a medium saucepan, combine the half & half and granulated sugar. Place the saucepan over medium-low heat. Stir constantly with a whisk until the sugar is fully dissolved and the mixture just begins to simmer around the edges. Do not let it come to a rolling boil.
- Once simmering, immediately remove the saucepan from the heat.
Step 2: Temper the Eggs for Creaminess
Tempering eggs is crucial to prevent them from scrambling when added to the warm cream mixture, ensuring a smooth custard.
- In a separate medium bowl, lightly whisk the two eggs until they are well combined.
- Slowly and gradually, whisk about half of the warm half & half mixture into the beaten eggs. It is vital to pour in a thin stream while whisking continuously and vigorously. This slowly raises the temperature of the eggs without cooking them.
- Once half the warm mixture is incorporated, pour the egg mixture back into the saucepan with the remaining warm half & half. Whisk everything together thoroughly.
Step 3: Cook the Custard to Perfection
- Stir the heavy cream into the egg and milk mixture in the saucepan.
- If using a vanilla bean, carefully split it lengthwise with a sharp knife and scrape out the tiny, fragrant seeds. Add both the vanilla seeds and the scraped vanilla bean pod to the cream mixture. If using vanilla bean paste, stir it in now.
- Return the saucepan to medium-low heat. Cook the mixture, stirring constantly with a heat-resistant spatula or wooden spoon, until the custard thickens slightly and coats the back of a metal spoon. This typically takes about 5-10 minutes. Avoid boiling the mixture, as this can cause the eggs to curdle.
Step 4: Chill the Base Thoroughly
Chilling the custard is a critical step for achieving the best texture and flavor in your ice cream.
- Pour the cooked custard mixture into a clean medium-sized bowl. If desired, you can pass the custard through a fine-mesh sieve to ensure an ultra-smooth consistency, removing any potential cooked egg bits or vanilla bean remnants.
- Cover the surface of the custard directly with plastic wrap. This prevents a “skin” from forming as it cools.
- Refrigerate the custard for a minimum of 2-3 hours, or ideally, overnight. A well-chilled base will churn more efficiently and result in a creamier ice cream.
Step 5: Churn and Mix in the Goodies
- Once the custard is thoroughly chilled, remove the vanilla bean pod (if using a whole bean). Pour the mixture into your ice cream maker’s frozen bowl or canister.
- Prepare the ice cream according to your manufacturer’s specific instructions. Churn until the ice cream reaches a soft-serve consistency, usually about 20-30 minutes, depending on your machine.
- When the ice cream has almost reached the desired consistency (still soft but mostly frozen), slowly drizzle in the fudge sauce while the ice cream maker is still running.
- Add the mini peanut butter cups. Let the machine churn for just a few more rotations (about 1-2 minutes) to evenly incorporate the fudge ripples and peanut butter cups throughout the ice cream. Be careful not to over-churn, as this can break down the texture.
Step 6: Harden and Serve
- Transfer the freshly churned ice cream to a glass loaf pan or an airtight freezer-safe container.
- Place the container in the freezer for at least 2-4 hours to allow the ice cream to harden to a scoopable consistency. For best results, freeze overnight.
- Alternatively, if you prefer soft-serve, you can enjoy it immediately after churning!
Tips for Achieving Ice Cream Perfection
- Chill Thoroughly: Don’t rush the chilling process for the custard base. A colder base churns faster and produces a smoother, creamier ice cream.
- Don’t Overfill: Most ice cream makers have a maximum fill line. The mixture expands as it freezes, so adhere to this guideline.
- Quality Ingredients Matter: Since there are only a few key ingredients, using high-quality half & half, heavy cream, vanilla, and fudge will significantly impact the final taste.
- Warm Your Fudge: Slightly warming your fudge sauce before drizzling it in makes it easier to swirl and ensures a beautiful ripple effect.
- Pre-chop Mix-ins: Have your peanut butter cups (or other candies) chopped and ready to go before you start churning.
- Airtight Storage: Store homemade ice cream in an airtight container to prevent freezer burn and keep it fresh for longer. You can also press a piece of plastic wrap directly onto the surface before sealing the container.
Customization Ideas for Your Moose Tracks
While the classic Moose Tracks combination is stellar, don’t be afraid to experiment with variations:
- Different Fudge Flavors: Try caramel sauce, white chocolate fudge, or a spicy chocolate sauce.
- Nut Butter Swirls: In addition to peanut butter cups, you could add a swirl of creamy peanut butter or almond butter.
- Other Candies: Instead of or in addition to peanut butter cups, consider chopped Snickers, Twix, M&M’s, or even brownie chunks.
- Nutty Additions: Toasted pecans, walnuts, or almonds would add another layer of crunch and flavor.
- Coffee Infusion: Add a tablespoon of instant espresso powder to your custard base for a subtle coffee undertone that pairs beautifully with chocolate.
Storing Homemade Ice Cream
To enjoy your homemade Moose Tracks ice cream at its best, proper storage is key:
- Airtight Container: Always transfer the churned ice cream to an airtight, freezer-safe container. This minimizes exposure to air, which can cause freezer burn.
- Surface Protection: For extra protection against ice crystals and freezer burn, press a piece of plastic wrap directly onto the surface of the ice cream before putting on the lid.
- Deep Freeze: Store the ice cream at the back of your freezer, where temperatures are most consistent.
- Enjoy Fresh: Homemade ice cream is best enjoyed within 1-2 weeks. After that, its texture may start to degrade, becoming icier.
Serving Suggestions
Your homemade Moose Tracks ice cream is a star on its own, but here are a few ideas to elevate your serving experience:
- Classic Scoop: A simple scoop in a bowl or cone is always perfect.
- Sundae Extravaganza: Top with extra hot fudge, whipped cream, chopped peanuts, and a cherry.
- Milkshakes: Blend a few scoops with milk for a thick, decadent milkshake.
- Ice Cream Sandwiches: Sandwich a scoop between two homemade cookies (like chocolate chip or peanut butter cookies).
This homemade Moose Tracks ice cream is truly a labor of love that pays off in every creamy, fudgy, peanut buttery bite. It’s the perfect treat for a hot summer day, a cozy movie night, or simply whenever a craving for something extraordinary strikes. Give this recipe a try, and prepare to be amazed by the rich flavors and satisfying texture of your very own artisanal ice cream!
Looking for more delicious ice cream recipes to satisfy your cravings? Be sure to try my Raspberry Chocolate Chip Ice Cream, Apple Butter Gingersnap Ice Cream, No Churn Cherry Amaretto Ice Cream, Peanut Butter Oreo Ice Cream or my Bourbon Vanilla Ice Cream. You’ll find a flavor for every palate!
Also, don’t miss out on some fantastic ice cream creations from my fellow blogger friends: explore their strawberry shortcake ice cream sandwiches, indulge in Irish whiskey ice cream with salted caramel, or whip up this easy blackberry ice cream. There’s a whole world of frozen delights to discover!
You can also find more delicious inspirations from Heather on Facebook, Twitter, and Pinterest!
Homemade Moose Tracks Ice Cream Recipe
This homemade Moose Tracks ice cream is the perfect treat for all chocolate and peanut butter lovers. Creamy vanilla ice cream is packed with hot fudge sauce and chopped peanut butter cups.
By: Brandy O’Neill – Nutmeg Nanny
Prep Time: 40 mins
Cook Time: 20 mins
Total Time: 60 mins
Cuisine: American
Ingredients
- 1-1/2 cups half & half
- 1 cup sugar
- 2 eggs, beaten
- 1 cup heavy cream
- 1 vanilla bean or 2 teaspoons vanilla bean paste
- 1/3 cup fudge sauce, of choice
- 1/2 cup mini peanut butter cups
Instructions
- In a saucepan over medium-low heat, stir together the half & half and sugar until the sugar dissolves and the mixture begins to simmer. Remove from heat.
- In a medium bowl, whisk the eggs. Slowly whisk in half of the warm half & half mixture into the eggs to temper them, whisking constantly to prevent scrambling. Add the remaining milk mixture and whisk to combine.
- Pour the egg & milk mixture back into the saucepan and stir in the heavy cream.
- Split the vanilla bean lengthwise, scrape out the seeds, and add them to the cream mixture along with the vanilla bean pod. (If using vanilla bean paste, add it now).
- Cook over medium-low heat, stirring constantly, until the cream coats the back of a metal spoon.
- Pour the custard into a clean medium-sized bowl and cover with plastic wrap, pressing the wrap directly onto the surface of the cream to prevent a skin from forming.
- Refrigerate for 2-3 hours, or preferably overnight, until thoroughly chilled.
- Remove the vanilla bean pod from the chilled mixture. Pour the mixture into an ice cream maker and freeze according to the manufacturer’s instructions until it reaches a soft-serve consistency.
- When the ice cream is nearly frozen, slowly drizzle in the fudge sauce while the ice cream maker is still running. Add the peanut butter cups and let it churn for a few more rotations to incorporate them evenly.
- Transfer the ice cream to a glass loaf pan or an airtight freezer-safe container and place it in the freezer to continue to harden for at least 2-4 hours, or serve immediately for a softer texture.